How to Organize Cables and Wires Under a Small Desk (Without Losing Your Mind)
Quick Answer
Start by grouping cables by destination, then mount a tray or raceway under the desk and bundle the rest into a single sleeve. This removes the visual mess, keeps cords off the floor, and makes cleaning or moving the desk far easier. You do not need a fancy kit—a tray, a sleeve, and a pack of adhesive clips solve 90% of small-desk cable chaos.
Why This Happens
Small desks create a specific kind of cable problem. You have less surface area, so devices get stacked and pushed toward the back. Power strips end up on the floor because there is nowhere else to put them. Every device adds at least one cable, and chargers, monitors, lamps, and speakers each bring their own.
A few things make it worse:
- Cables are different lengths. A 6-foot monitor cable and a 3-foot charging cable want to go to the same place, so one loops and one pulls tight.
- Power strips live on the floor. Dust, feet, and vacuum cleaners all conspire against them.
- No fixed anchor point. Without a tray or raceway, cables drift and tangle over time.
- You add devices gradually. Nobody plans a mess; it accumulates one USB hub at a time.
The fix is not about being neat. It is about giving cables a defined path and a place to live.
How to Fix It
1. Unplug everything and sort by destination (free)
This is the most important step and it costs nothing. Unplug every cable, then lay them out. Group them into three piles: cables that stay on the desk (keyboard, mouse, webcam), cables that go to the floor (power, Ethernet), and cables that go to a wall outlet or another device.
Once sorted, you will see which cables are unnecessarily long and which can be replaced with shorter ones. You will also notice cables you no longer need at all—old chargers, dead USB cables, that mystery adapter. Removing three cables is easier than organizing them.
2. Mount a tray or raceway under the desk (low cost)
An under-desk cable tray is the single biggest visual improvement. It gives the power strip and excess cable a home that is off the floor and out of sight. Look for a tray that mounts with adhesive or clamps if you cannot drill. A cable raceway along the back edge works well for small desks because it follows the desk’s shape.
Measure the underside of your desk first. Small desks often have a support bar or a drawer mechanism that limits where a tray can go. Mount the tray near the back edge, centered, and leave room for the power strip’s cord to reach the wall.
3. Bundle cables into a sleeve or spiral wrap (low cost)
Once cables are routed, bundle the ones that travel together. A zippered sleeve lets you add or remove cables without redoing the whole bundle. Spiral wrap is cheaper and more flexible but takes longer to apply. Either way, leave a service loop—a loose U-shape—near the back of the desk so you can pull the desk out without yanking anything.
4. Use adhesive clips and labels (free to low cost)
Adhesive cable clips keep individual cables from sliding around. Put them every 6–8 inches along the desk’s underside. Label both ends of each cable with masking tape and a marker. This is the step people skip and later regret.
5. Choose furniture that helps (higher cost)
If you are still shopping for a desk or chair, some designs make cable management easier from the start. A desk with built-in cable management, drawers, or a hutch gives you places to route and store things. A chair with a smaller footprint leaves more room under a small desk for a tray and your legs. This is the least practical fix if you already own furniture, but worth considering if you are upgrading.
Products That Help
SEDETA L Shaped Electric Standing Desk with Hutch

This is an L-shaped standing desk with a hutch, drawers, and storage shelves. For cable management, the hutch and drawers give you vertical storage and a place to route cables behind the desk rather than across it. The L-shape also means more under-desk surface area for mounting a tray, which helps in a small room where you cannot spread out.
Pros:
- Hutch and shelves keep devices off the desktop, reducing cable clutter.
- Electric height adjustment means you can set a comfortable working height, which makes under-desk routing easier to reach.
- Drawers give you a place for small accessories that would otherwise sit on the desk.
Cons:
- Assembly is involved, and you will want to plan cable routing before you bolt everything together.
- It takes up more floor space than a simple rectangular desk, so measure your room first.
46 Inch Electric Standing Desk Converter with Wireless Charging

A standing desk converter sits on top of an existing desk and raises your work surface. It is useful for cable management because it keeps your monitor and keyboard at a consistent height, so you can route cables once and not fight them every time you adjust. The wireless charging pad also removes one cable from the desk entirely.
Pros:
- Lets you keep your current desk, so you do not have to redo cable routing from scratch.
- Wireless charging eliminates a charging cable on the desktop.
- Raises the work surface, giving you more room underneath for a tray or basket.
Cons:
- Adds height, so you need to check that your monitor and chair still line up comfortably.
- The converter itself needs power, so plan one cable to the wall.
Serta Bryce Executive Office Chair

This is an ergonomic executive chair with bonded leather and AIR lumbar support. It helps with under-desk cable management mostly by being comfortable enough that you do not constantly shift and kick cables around. A chair that fits well also lets you sit closer to the desk, which means shorter cable runs and less slack on the floor.
Pros:
- Lumbar support encourages better posture, so you are less likely to shove cables out of the way with your feet.
- Executive styling fits a home office without looking out of place.
- Bonded leather is easy to wipe clean, which matters in a dusty under-desk area.
Cons:
- Bonded leather can wear over time, especially in warm rooms.
- It is a full-size chair, so check that it fits under a small desk without crowding your legroom.
CAPOT Ergonomic Mesh Office Chair
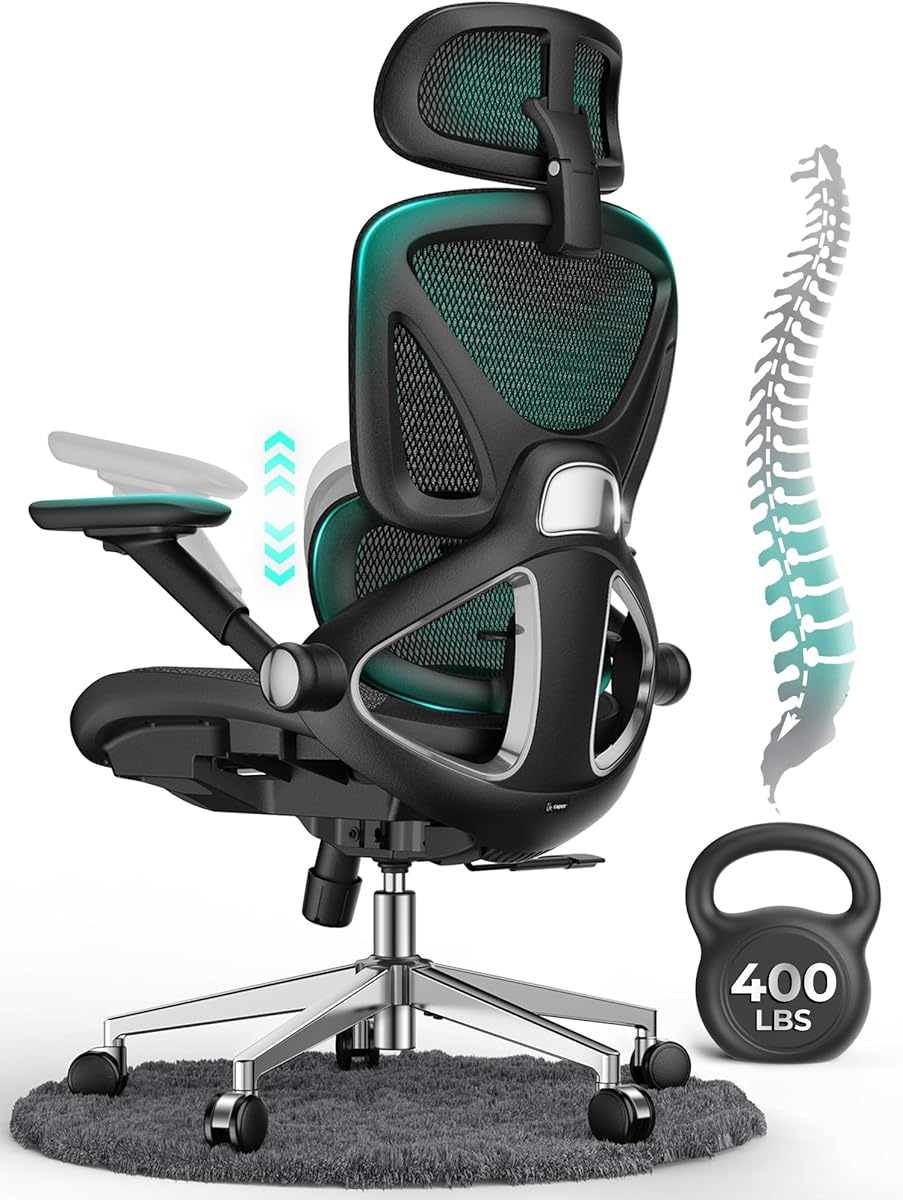
This is a mesh office chair with adjustable lumbar support, a high back, and 4D flip-up arms. The flip-up arms are the cable-management angle here: with the arms up, the chair slides further under a small desk, giving you more clearance for a cable tray and keeping the chair from rolling over cords on the floor.
Pros:
- Flip-up arms make it easier to tuck the chair under a small desk.
- Mesh back breathes well in a warm home office.
- Adjustable lumbar support helps you sit comfortably for longer stretches.
Cons:
- Mesh can be less plush than padded chairs for some people.
- The high back takes up visual space in a small room.
What to Look For
- Mounting type: Adhesive or clamp-on trays work for most desks without drilling. Check that the adhesive is rated for the surface (wood, laminate, metal, glass).
- Size and capacity: Measure the underside of your desk and the length of your power strip. A tray that is too small will not hold the strip plus excess cable.
- Sleeve diameter: Choose a sleeve wide enough for the number and thickness of cables you are bundling. Zippered sleeves are easier to adjust later.
- Service loop: Any tray or sleeve should let you leave slack near the back of the desk so the desk can move without pulling cables tight.
- Cable clips and labels: A pack of adhesive clips and a roll of masking tape cost very little and make the biggest long-term difference.
- Desk compatibility: If you have a standing desk, confirm the tray or sleeve can flex as the desk moves. Avoid tight zip ties on moving parts.
FAQ
How do I hide cables under a small desk without drilling holes? Use adhesive-backed cable clips or a no-drill under-desk tray that clamps or sticks to the surface. Clean the area with rubbing alcohol first, then press firmly for 30 seconds. These hold well on most wood, laminate, and metal desks and remove cleanly with a little heat from a hair dryer.
What’s the best way to manage a power strip under a desk? Mount the power strip to the underside of the desk or to a leg using heavy-duty Velcro or a mounting bracket. Keep it close to the devices it powers so cords stay short, and leave the strip’s own cord with a service loop so you can pull the desk out without unplugging everything.
How many cables can a typical cable sleeve hold? Most zippered sleeves handle 5–10 average cables (power, USB, HDMI, Ethernet). If you’re bundling thick power cords with data cables, size up or use two sleeves. Never bundle power and data cables too tightly for long runs—some interference is possible, though short desk runs are usually fine.
Should I label cables under my desk? Yes, especially if you have more than six. Wrap a small piece of masking tape around each end and write what it connects to. It takes five minutes and saves you from unplugging the wrong thing later. Label both ends—device side and power strip side.
How do I keep cables tidy when I move my standing desk up and down? Leave a service loop (a loose U-shape) of slack near the back of the desk and secure cables to the underside, not to the wall. Use a sleeve or spiral wrap that can flex as the desk moves. Avoid zip-tying cables tightly to the frame—they need room to travel.
What if my desk has no lip or edge to attach a tray? Look for adhesive-mount trays or use a small basket attached with heavy-duty Velcro. Alternatively, run a cable raceway along the back edge of the desk surface. If the desk is glass, avoid clamps and use only removable adhesive products rated for glass.